Monday, May 30, 2011

Worry-Free Jewelry*: Friendship Bracelet Grown-Up

Do you remember the Friendship Bracelet I showed you a while ago?

Well, look at how it grew up!

We were heading to a rodeo and the theme was Tough Enough To Wear Pink.  Well, my mom is a breast cancer survivor, so she brought over pink fabric for all of us to wear. 

 D used the friendship bracelet method on three strips of fabric to make her hat decoration. (Her strips were about 1.5 inches thick and 2 yards long.)


I turned mine into a scarf/necklace.  We used thicker strips of fabric, probably 5 inches each.


Then today I was at an event and I saw a bundle of string that was for balloons.  I thought, huh, that would make a totally cute necklace if it was twisted.

I took kite string.
And put the kiddos to work.

I used two yards lengths.  I separated my two oldest kids about two yards apart and sent little L wrapping the string around their hands.  See how their hands are held up?  We went 15 times, so that total there was 30 strings.  Then D and I started twisting.  I wanted it to be really tight.  Then I followed the steps just like in the post.  And WAh LA new necklace that looks amazing but it is worry-free*!

Dress it up and be oh so chic.

Here is the reason why the pics were taken inside:

I was getting blown away.   (I was holding my shirt down so I didn't look like I had wings.)

*OK, what is worry-free jewelry?  Have you ever had a kid break your string of beads?  Have you ever had a kid gnaw on your costume jewelry and you wonder what are they ingesting?  Have you ever broken your necklace yourself because you were being a mom?  Or being active?  Worry-Free Jewelry is an answer to those woes.  Easy to make, and easy to fix.  (And usually cheap). 

Friday, May 27, 2011

Ranch Style Potatoes

Necessity is the mother of all creation.

Years ago, money was tight and I wanted to find a way to create a treat for my kids.  I remembered the story of the potato chip (totally unverified).  A waiter was angry with a customer so he left the customer's potatoes in the fryer too long and ended up with a chip.  It backfired cause everyone loved them.  And now it contributes to the national waistline. :)

So I thought I could make my own "chips".  I sliced my potatoes thin and seasoned 'em up and baked 'em.  And Ranch Potatoes were born.

They got their name because when I first made them we loved to dip them in Ranch Dressing.  Now, half the family doesn't eat dairy, so not so much Ranch.  But the name lives on.

Here you go:

Ranch Style Potatoes

Potatoes (3 or 4 will fill your cookie sheet)
Seasoning

Slice your potatoes thin. (I love using my food processor or my son, J.  He loves slicing them.)

Grease your cookie sheet (my preferred method being cooking spray).  Then season your sheet.  Before the dairy allergies were known, I loved using Parmesan Cheese and garlic salt.  Now I use a seasoning salt.  Cajun seasoning are fun too.  (My current fav is Morton Season-All Garlic.)

Then place your potatoes on sheet in single layer.  Season potatoes. (Back in the day I put one seasoning on one side and a different one on the other.)


Bake. (Now here is the beauty.  If you've got something in the oven already, these are not picky.  Any temp from 350 to 450 will work.)  At 450 they could cook up as fast as 15 minutes.  At 350 they can take up to 30 minutes.  Just watch 'em.  I like to wait till the edges are brown. (The thin ones get all crispy and yummy.)


Pull them out and serve.  I love to dip mine in Ranch Dressing and BBQ sauce mixed.  Some of my kids love plain ketchup and others like malt vinegar.

Cheap and easy and super pleasy.

Wednesday, May 25, 2011

Crochet Hot Pad

I learned how to crochet a few weeks ago. (I learned when I was a teen, but it never really stuck.)  I learned a basic hot pad pattern.  I've seen it mentioned lots on blogs, but never given.  So I am going to give it.

You'll need:
  • Size I crochet hook
  • 4 ply worsted yarn
Chain 43. Single Crochet in back of 2nd loop from hook; continue in back loops across. Do not turn.

Single crochet in back loop across. Continue single crochet in back loops until sides meet each other.  Finish off leaving an 8" length of yarn.  Sew sides together.

Sounds simple enough, right?  Holy Cow!  Its a completely new language.  Now, find a good book and learn the basic crochet stitches.  This hot pad is two layers.  You are stitching in an oval and eventually the sides will meet and it will become square.  Its like voodoo.  One minute you are crocheting a bookmark and a few stitches later it looks like a slipper.  Then, before you know it, its a double-ply square.

Now, a word about gauge.  Both of those potholders were made with this pattern.  Both of them started out with 43 chains.  But their size difference is huge.  So, go loose and go easy and you'll be fine. 


You'll notice that the green one (my first attempt) has defined rows and the gray one doesn't.  For the green one I only went through the top loop and in the gray I went all the way through both loops.  (Don't know if that makes sense, but it was an exciting discovery for me.)

I like this project.  In high school I attempted to make an afghan.  Didn't work.  Too big a project and I got bored.  Hot pads are done in two movies.  Love it.

One more thing: You can add a lovely stripe.  It'll go on two sides of each side.  Just change yarns after you start to see the corners.  Go round the bend a few times and change back to your original.

Happy Crocheting.


Tuesday, May 24, 2011

Friendship Bracelets

Both my girls are Girl Scouts. I am a troop leader for Daisy Girl Scouts for little L.  D's troop became a sister troop and throughout the year we've gotten together for little things. (D's  Cadet troop is all 6th graders and L's troop is full of kindergartners.)  Last week the Cadets came to our troop meeting and taught the girls about being friends.  Then they teamed up and made friendship bracelets.  I had never seen this technique before so I thought I would share so you can do it with your littles.

Note the one worn.  It was made with 4 strands.
The one in her hand was made with 9.

Here are some of my girls.  They were cold, but I had them hold up their wrists so we could see.


You will need yarn and two people, which is part of the charm.  It takes two people working together to create something fun. (Oh so many lessons and parallels we could make while creating these.)

4 strands of yarn will create a thin-ish bracelet.  9 strands creates a fun choker.  The 9 strand example started with a yard each.

(A note on colors: If you keep your colors together at the beginning, you will create the candy-stripe look.)

Stretch the yarn between the two of you.

Begin to twist.

Keep twisting.

And twisting.

Until it is super tight.

A good way to check if it is tight enough is to give some slack.  If your rope starts to twist, you're doing good.

Now, one person find the center and hold it tight with one hand and with the other give their end to their partner.

Let go of the center and the person holding both ends gets to shake, shake, shake till it all twists up.

If it isn't evenly twisted, the partner not holding it can smooth out those bumps along the way.


The end will have a loop in it.  Bring the two ends to the loop.  Pull half of your ends through the loop and then tie the ends together with the loop in between. 
And you will get:

This!

Go out there and teach team work and create some fun friendship bracelets. 

I think these would be fun to try with embroidery floss as well.  I wonder how they will turn out . . .
**If you look carefully you will see the smaller versions on each of the girls.

Monday, May 23, 2011

Chicken Salad

I'm writing this mostly for myself so I don't forget my awesome creation. (Not too original, but I'll forget it. And sorry for no pretty pictures.  The girls ate it up.)

Today's challenge was that one of L's friends is Gluten intolerant.  I was struggling to figure out lunch for three kinde garteners (yes I know its spelled wrong, but I love the way it sounds).  What would they eat?

So as I cruised my pantry and freezer I found canned chicken.  I made chicken salad and told the girls we were having a tea party and eating tea party food. :) (Trickery at its finest)

Take one can of chicken, one celery stalk (chopped), one half apple (peeled, cored, and chopped), and some blueberry flavored Craisens.  Mix it all together and add mayo till its as moist as you like it.  I like it fairly dry.

Enjoy on crackers or bread or with a fork.  The three monkeys enjoyed 4 bananas between them with their chicken salad. 

The two big kids came home during our lunch and begged for the left-overs.  They were so sad that they each only got half a sandwich. 
I need to remember this for an easy yummy simple dinner.  Especially on a hot summer night (if those nights ever come--its still freezing here in UT).

*** My Craisens were dry.  So I soaked them in hot water for a bit and they were perfect.

Sunday, May 22, 2011

Beach Spray for Hair


Crescent City, CA 2008*

Don't you love the way your hair feels after a day at the beach?


The other day I followed a link to a slide show with summer hair.  I'm currently growing my hair out after 5 years of short.  So I am in need of hair ideas.  This article kept talking about beach spray.  And the last sentence, after suggesting several that you could buy for a pretty penny, said my favorite words: Or you could make your own.

I love those words!!!  I live for those words!

I googled how to make it.  I found several recipes and decided to give 'er a try.  I just warmed up water (important for the salt to dissolve) and added sea salt until it tasted like the ocean.  Then I added a few drops of Lavender oil so it smells good.  Poured the mix into a spray bottle and I was set. (remember to shake well if you add oil)

In my house we have three different types of hair.  I have medium length, fine, with natural curl.  Little L has fine hair with no curl (but two whirls at the back, I kept it boy short for years cause of those crazy whirls).  Miss D has hair to die for.  Thick, long with just a bit of wave.

Here are the results on our different hair types:
(Maybe taking my own pics is worse than having D take them)

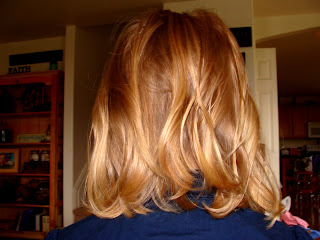
Look at the casual curl


This has a great messy look


We had to twist it.  If you have no curl, twist it.

Since taking these pics I've had lots of fun using my beach spray.  Its great to spritz at the roots to get some curl for a messy up-do or side pony. (Mine is still so short I can't do much.)

So, go out there and make your own day at the beach!

*My poor sweet kids have never been to a warm beach.  They only know the Northern Pacific.  Those beaches are cold, but still so fun.  Someday they will go to a beach you can actually swim at.  I wonder what their reaction will be.

Profeanna had a good question but blogger isn't letting me post comments. (Soooo irritating) So I am adding it here in hopes that she'll come back. :)

That is a good question. Unfortunately I was using a salt grinder andn I didn't pay attention to how much I put in. When it tastes less like good salt and more like bad salt (or until you gag) that might be a good indicator. I'll try a new mixture and measure before I add. Then I'll get back to you!


I'm linking this up to:
http://www.skiptomylou.org/
http://sumossweetstuff.blogspot.com/
http://gigglesglitzandglam.blogspot.com/
http://sewchatty.blogspot.com/
http://www.tipjunkie.com/homemade-projects-add-yours-10/

Thursday, May 19, 2011

The Rain Stopped For a Bit and The Crazies Went Crazy

This is just my kids jumpin on the ol' Trampoline.  My oldest is almost 12 and I know these moments are short lived.  So I went outside and took 150+ pics. (The nerdy part being that I was trying on the maxi-dress to fix the straps and ran out to capture the moment.  So, yeah, I'm a  nerd.  But I caught my kids liking each other.  Must seize that moment.)

 L stubbed her toe. :(

 J and L love each other occasionally.
 Medusa #1
 Medusa #2

Wednesday, May 18, 2011

MaxiDress Try #1: Lessons Learned

I am in love with the maxi-dress.  They look so flowy and easy and cute.  I've wondered if one would look good on my curves (which are more pear-like than goddess like).  I tried one on, but it was too big and they didnt' have my size.  It looked OK (hard to tell when the bust area made me look like I'd just had a baby in a disturbing sort of way).  It felt amazing.

One of the side-effects for me with MS is that I am almost always hot.  And in the summer if my body temp rises I feel it in LAME ways.  So I try to stay cool in the summer.

As I've looked at some, I thought, I could totally make that.  And I did.  And I learned a few lessons:

  1. Pre-Wash your fabric.  The maxi-dress's appeal is its toe-peaking length.  When I put mine together it was super long, so I trimmed a bit and hemmed a bit.  Then I washed it.  Now my whole foot shows. Dangit!
  2. When creating your own pattern, don't use the fabric you are in love with on your first try.  I love this fabric.  And if I were to get more, I would have to travel 55 miles round trip to get. (See below for fun story on its acquisition.)
  3. Put elastic casings in before you add your elastic thread rows.  Elastic thread is not enough to hold all that flowy fabric above your bust.  So put in a casing FIRST.  I did not.  I went to Robyn's and begged her to help me sew down a band of elastic.  It didn't turn out pretty, it wasn't easy.  Do a casing first and all that heart-ache will vanish.  Plus, if you didn't learn from my mistakes, when you finally wash your dress, the elastic will be wonky.
  4. A maxi-dress made with shirring needs straps.  On a dress that long, do you really want to risk it?  You could step on it, get it caught in a door, have a small child pull on it.  All with the same result: Your dress down at your waist (or lower) and you turning a lovely shade a rose.  When I was in my 20's I loved wearing sarongs.  One time I jumped off a swing and my sarong fell to the floor.  Soooo not pretty.
  5. Watch carefully your shirring.  I went too low and it made it look like a baby dress. Dumb.  Fortunately it shrank in the wash.
  6. Don't ask your daughter to take your pics.  And don't try to take pics on a day when you had no straightener to fix your crazy hair.  And find a skinny person to be your model.  These pics are a blow to my self-esteem.  Have ya heard how anorexic people have a distorted body image and they see themselves as much heavier than they are?  I have the opposite problem.  I see myself much skinnier.  I am quite happy with that image.  So pics of myself are shocking. To say the least. :)

Here you go with all my lessons learned.  I am going to try again.  This time I think I am just going to do shirring above the bust and below.  And I'm not going to use quite as much fabric as I did. (I managed to wrap 2.5 yards around me.)

I do love it though.  I've added straps that I'm not sure about.  They look a bit like suspenders to me.  But I tried it on with the wrong under shirt, so that cold be part of the problem.  I will wear it, and I might just drive those 55 miles and hope there is more of the fabric.

OK, so here is the story behind the fabric.  Robyn and I were headed to a meetup of bloggers and she wanted to print 5x7 business cards.  We went to pick them up at the Walmart by us, but due to some random clerical error, the order did not get printed.  So the nice people at Wally's sent the order further away closer to downtown Salt Lake, where we were headed.  I ran into the random Wally's with Robyn and as we were headed to the photo department, I stopped dead in my tracks at the sight of this fabulous fabric.  She ran ahead and I bought me some of it.  YUM. (As I look at the pics I think even more how much I L-O-V-E this fabric.

Saturday, May 14, 2011

Woman of the Year

So, I really am hesitant to post this, cause its kinda tooting my own horn.  But really I was so happy to be given this honor.  I recently was awarded Eagle Mountain's Women of the Year.

I got the award a few months ago at the Miss Eagle Mountain Pageant.  It was a complete surprise.  Here I was in jeans and a t-shirt (but with bling) and a pony tail and the mayor, who is an old friend, is in a ball gown.  I was a tad under dressed for the event.  But my hubby did a good job of getting me there and keeping the surprise.

You can read a cute article about it HERE

From what I can gather one of my Daisy Girl Scout mom's talked to her mom, who is also the head secretary at my kids school.  The two of them went on a mission and gathered several nominations for me to win this. (I've heard rumors of around 30 nominations)

So now you know a little more about me and all the craziness that I do.

If you want a complete list of all the things that I currently do, read on.  But if you are bored or think that I have a big head, you can just stop reading.

Girl Scouts (I am a Daisy Troop leader and a Parent Helper for my other daughter's Cadet Troop)


Boy Scouts
PTA


Region 9 (Alpine School District) Leadership VP


State Convention Committee


I was recently elected to serve as the Leadership VP for Vista Heights Middle School


(In the past, I have served as PTA President at Eagle Valley Elem, and as Westlake Council Pres)


School Community Council (for 3 or 4 years)


Neighborhood Watch block captain


EMFD Babysitter class. Steve put together a class to teach babysitting skills and Infant CPR. I help teach the business and immediate safety (I think there was a write-up about it in the Herald)


Eagle Valley Elem Christmas Play: I help direct it, for the past 4 years


Precinct Secretary and County Delegate for the Republican Party


Eagle Mountain Writers (more commonly known as InkingCap) just a small group of aspiring writers. (Last year I helped run an after-school creative writing class.)


Pony Express Days. Sometimes I've just helped with the Fire Department Association fundraiser, in the past I've also helped with Family Fun night and volunteer coordinators. This year I'll be helping with the 5K. (Steve reminded me that its been every year except the very first one--we moved here from Seattle in August that year)


Team Mom (baseball and basketball)
 
Room Mom